- HomeX Magazine
- Decor Trends
- 8 wall trim ideas that give a plain room some character
8 wall trim ideas that give a plain room some character
Adding wall trim is a simple way to upgrade builder grade drywall. Review eight wall trim ideas to give a plain room lasting character without a full remodel.
Words by Pilar Whitaker
- 6 minute read
Empty drywall leaves a room looking flat. Wall trim adds depth and shadow. Wood or composite moldings build character into builder grade houses without the mess of a full remodel.
1. Picture frame molding on plain drywall
Picture frame molding breaks up large, flat walls. Squares or rectangles of thin trim create symmetry and draw the eye across the room. It works well above a chair rail or running directly from the baseboard up to the ceiling line. Living rooms and dining rooms benefit most from this formal, tailored touch.

Planning the layout takes more effort than the actual cutting. Tape out the boxes on the drywall first to check the spacing around outlets and light switches. Leave an even border between the frames and the edges of the wall.
Using a laser level helps the boxes line up across the room. Pine or primed medium density fiberboard are affordable material choices. A brad nailer secures the thin wood without splitting it. You can break up a large empty space by centering these frames around wall sconces or large pieces of art.
2. Board and batten for halls and mudrooms
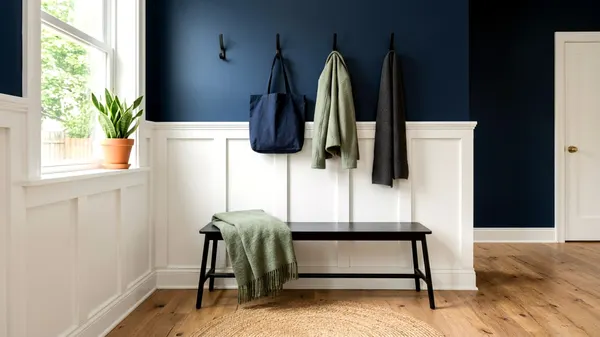
Board and batten treatment puts flat vertical strips over the drywall, capped with a horizontal top rail. The clean lines suit casual spaces and high traffic zones. Mudrooms, staircases and hallways look finished and gain a tough surface. The wood stands up to scuffs from shoes and heavy bags.
Most treatments cover the lower two thirds of the wall. Pine boards in a 1 by 3 or 1 by 4 size create the vertical battens. A wider 1 by 6 board forms the horizontal top rail. A small top ledge offers a natural place to hang hooks for winter coats.
Installation is straightforward because most cuts are simple square chops. The wall itself acts as the smooth panel behind the vertical battens. A generous application of caulk seals the gaps between the wood and the drywall. Painting the trim and the wall the same color creates the illusion of solid custom woodwork.
3. Chair rail with two paint colors
A chair rail divides the upper and lower wall with a single strip of horizontal wood. It traditionally helped protect walls from the backs of dining chairs. The trim gives a natural break to feature two different paint colors or wall materials.
Traditional homes often pair a crisp white painted lower section with a patterned wallpaper above the rail. Paint the lower half a darker color to ground the space. You might paint a crisp lower wall in navy blue and leave the top half a soft white. The contrast adds depth to a plain, boxy room.
Installing the molding requires finding the wall studs and making a few angled cuts at the room corners. The height of the rail determines the proportions of the room. Setting the rail about a third of the way up the wall is a common starting point. It is an inexpensive weekend project that changes a dining area.
4. Wider window and door casings
Builder grade homes often have thin, plain casings around the doors and windows. Pulling off that narrow wood and installing wider interior window trim makes the openings look substantial. A wide casing acts like a heavy frame around a good painting.
Wider trim upgrades the room without moving any drywall. A classic craftsman look uses a flat 1 by 4 board for the vertical sides. A wider 1 by 6 board forms the top head casing. This square edge style requires no complicated mitered angle cuts.
The side boards butt right up against the bottom of the head casing. Primed pine boards give a smooth surface for the final coat of paint. The thicker wood hides awkward gaps between the drywall and the door jamb. Leaving a tiny step back between the jamb and the casing keeps the lines looking sharp.
5. Crown molding sized to the ceiling height
Crown molding bridges the sharp 90-degree corner between the wall and the ceiling. The angled wood softens the harsh transition and draws the eye upward. Getting the scale right matters more than picking an ornate pattern.
A small room with a low ceiling needs a narrow crown profile. A room with tall ceilings swallows small trim and demands a wide molding. Simple coved profiles suit modern spaces, while stepped profiles fit older traditional homes.
Crown molding is hard for beginners to cut. The wood sits at an angle on the saw bed and requires upside down and backward cuts. Pros often cope the inside corners with a coping saw instead of cutting straight miters. Coping removes the back of the wood so the front edge overlaps the neighboring piece perfectly.
6. Beadboard or wainscoting in a bathroom
Bathrooms face high humidity and frequent splashes from sinks and tubs. Beadboard wainscoting covers the lower half of the wall with vertical grooves to protect the vulnerable drywall. The grooved panels add immediate cottage charm and visual texture to a tight space.
Tongue and groove individual boards provide the most authentic look. Sheets of beadboard go up much faster over bare drywall. A tall baseboard covers the bottom edge and a chair rail caps the top edge.
Solid wood or cellular PVC panels tend to hold up better near a bathtub or shower stall. Medium density fiberboard can swell if water gets behind the paint.
7. Thicker baseboards that ground a room
Standard builder grade baseboards barely cover the gap between the floor and the wall. Upgrading to a tall baseboard instantly grounds the room. The taller profile gives the floor a solid border and makes the ceilings feel higher.
Flat baseboards look modern and clean. Baseboards with a rounded or stepped top edge look traditional. Crisp white painted baseboards define the edges of the room sharply against darker flooring. You can tackle home improvement projects like this one room at a time.
The work involves straight cuts for the long wall sections and angled cuts for the outside corners. Adding a thin shoe molding at the bottom hides uneven floors and gives the tall baseboard a finished base.
8. Removing old painted trim safely in an older home
Replacing trim in an older home means pulling off decades of painted wood. The EPA says that in 1978 the federal government banned the sale of lead based paint for use in homes. The EPA says homes built before 1978 are more likely to have lead based paint, and renovation that disturbs painted surfaces can create a hazard.
Scoring the edges of the old trim with a utility knife breaks the paint seal. A flat pry bar gently levers the wood away from the drywall. The EPA says the RRP rule generally does not apply to homeowners working on their own home, but it recommends lead safe work practices or a lead safe certified contractor.
For DIY work the EPA advises sealing off the work area, misting surfaces to keep dust down, using HEPA vacuums and cleaning thoroughly each day. Taking down the trim slowly keeps the dust down and helps protect the drywall paper from tearing.
Which wall trim ideas suit a beginner and which need a carpenter
Board and batten and wide square window casings are excellent beginner projects that use straight cuts and simple joints to hide minor mistakes. A chair rail also goes up fast with just a few basic outside miter cuts. Picture frame molding takes patience to measure, but the thin wood cuts easily. A basic miter saw and a level are the only tools required.
Crown molding remains a job best left to a skilled carpenter because the complex compound angles require precise measurement and specific saw skills. Ceilings are rarely perfectly level, so the molding requires constant adjustment to fit tight. A carpenter saves time and wasted lumber on crown molding. Complex traditional wainscoting with raised wood panels also demands a professional finish.