- HomeX Magazine
- Floors and Layouts
- 6 kitchen layouts and how to pick one for your space
6 kitchen layouts and how to pick one for your space
Compare 6 common kitchen layouts to find the right design for your space. Learn how galley, L shaped and U shaped setups can make cooking much easier.
Words by Pilar Whitaker
- 6 minute read
Choosing among kitchen layouts determines how well the room works for cooking and gathering. The right shape puts appliances within easy reach and leaves space for traffic to pass safely. Room dimensions usually dictate whether a single wall, a galley or an L shaped kitchen layout makes sense.
1. One wall kitchens for small spaces
A one wall layout places the sink, stove and refrigerator along a single straight run of cabinets. Studio apartments and small houses often rely on this arrangement to preserve floor space. Placing everything on one wall leaves the rest of the room open. This free space easily holds a dining table or an area rug for a sitting space.
Efficiency drops when a single line of cabinets grows too long, making meal prep a chore. Keep the primary work zone compact by placing the sink directly between the refrigerator and the stove. This setup provides a central prep area flanked by cold storage and the hot oven.
Storage space gets tight in a one wall design. Taking the upper cabinets all the way up to the ceiling provides extra room. Reserve those high shelves for turkey roasters or holiday platters used only a few times a year. Maximizing vertical storage keeps the daily work counters clear of clutter.
2. Galley kitchens and how to make them work
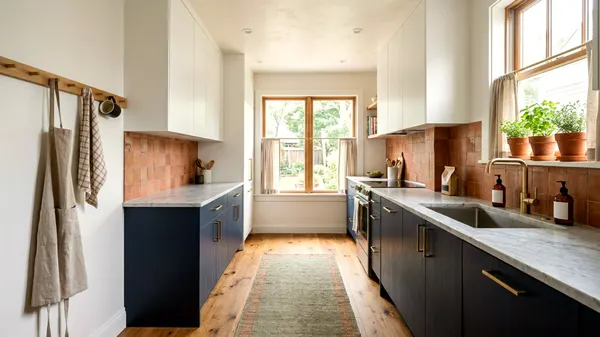
A galley kitchen features two parallel runs of cabinets facing each other across a central walkway. Many cooks like this tight, efficient work zone. Turning from a cutting board next to the sink to a boiling pot on the stove requires only a single step. Everything stays within arm's reach.
Older homes often feature enclosed galley layouts that act as a corridor to the back yard. Choosing the right cabinets keeps these tight spaces from feeling like a cave. Lighter paint colors and good overhead lighting bounce light around the narrow footprint. Pale finishes push the walls outward visually.
Aisles must stay wide enough to allow base cabinet doors and appliances to open fully. The gap between opposing counters needs to fit a lowered oven door while leaving floor space for the cook. A cramped galley means bumped elbows.
3. L shaped kitchens and the open corner
An L shaped kitchen layout consists of two adjacent cabinet runs meeting at a right angle. This design pushes the cabinetry into a corner and leaves two sides of the room entirely open. Household traffic flows easily past the work area without disrupting the person chopping vegetables.

Medium and large rooms handle an L shape well because the open floor plan welcomes a central dining table. Grouping the refrigerator and tall pantry cabinets on the shorter leg of the L works best. This keeps the longer leg free for uninterrupted counter space and wall cabinets.
Corners create storage problems in any layout. Base cabinets that meet in a blind corner form a deep, dark cavern. Reaching a heavy cast iron pot in the back requires kneeling on the floor. Installing a spinning lazy Susan or wire pullout shelves reclaims that awkward space for daily use.
4. U shaped kitchens for serious cooks
Three adjoining walls of cabinets form a U shaped layout. This design surrounds the cook with continuous countertops on three sides. It provides plenty of drawer and shelf space. The closed end of the room creates a dedicated cooking zone completely isolated from hallway foot traffic.
U shapes require plenty of square footage to function well. A narrow room with deep base cabinets on three sides feels cramped. The floor space between the opposing counters must allow two people to pass each other safely. Putting cabinets on three walls of a narrow room leaves a tight center aisle.
Placing the sink at the bottom of the U under a window provides a pleasant view during cleanup. The stove and the refrigerator take up positions on the opposing side walls to spread out the bulky appliances. This arrangement balances the room visually and gives every work station plenty of elbow room.
5. Island and peninsula layouts
An island layout adds a freestanding block of base cabinets to the middle of the room. Islands can direct traffic away from the hot stove. They add seating and give the cook a large flat surface for rolling dough. They work well in open floor plans where a single wall needs additional utility.
Peninsulas work much like islands but attach to a wall or another run of cabinets on one end. A peninsula turns an L shaped design into a U shape or forms a protective barrier across an open room. Smaller rooms that lack the clearance for a freestanding island can often fit a peninsula.
Adding either element changes how people move through the house. Proper clearance around the new cabinetry prevents bottlenecks. Knowing the right island clearances ensures the new layout functions safely. Walking around the island should feel natural, not like an obstacle course.
6. Testing a plan with the work triangle
The kitchen triangle concept links the sink, the stove and the refrigerator. Drawing an imaginary line between these three appliances creates a triangle on your floor plan. Testing a layout against this shape reveals how efficiently a cook can move between the primary work stations.
Local building codes set electrical and plumbing rules, while the NKBA figures below are recommendations. For spatial planning, the National Kitchen and Bath Association provides standard design recommendations. NKBA kitchen planning guidelines recommend that the three legs of the work triangle total no more than 26 feet, with no single leg under 4 feet or over 9 feet.
Obstacles inside the triangle break the cook's momentum. The NKBA says no work triangle leg should cross an island or peninsula by more than 12 inches. Adjusting the placement of the major appliances keeps the path clear. A well planned triangle can save many wasted steps over a year of cooking.
Keeping traffic out of the cook's way
Good kitchen layouts separate the working cook from household traffic. Kids running to grab a drink should not have to squeeze past an open oven door. The NKBA recommends that no major traffic pattern cross through the basic work triangle.
Aisles require enough width for people to work and move comfortably. A narrow walkway causes collisions when doors open and people bend down to load a dishwasher. The NKBA recommends a work aisle of at least 42 inches for one cook and at least 48 inches for multiple cooks.
Taking physical measurements before finalizing a design prevents expensive mistakes. Taping the proposed cabinet boxes on the floor helps you visualize the real clearances. An accurate remodel cost estimate keeps the budget on track as you modify floor plans. Walking the taped paths confirms whether the chosen layout fits the room.
Choosing the best design for your home
Picking a layout means balancing what you want with what the room can handle. Moving a sink or a gas stove across the room requires moving plumbing lines and exhaust vents behind the drywall. These utility changes add significant cost and time to any project.
Start by drawing the empty room on grid paper. Mark the locations of existing windows, interior doors and plumbing stacks. Plotting the fixed elements on paper reveals which layouts remain practical. A galley or an L shaped design might turn out to be the only option.
Look at how your family uses the current layout before tearing out any cabinets. If the cook constantly bumps into people grabbing snacks, the new plan must prioritize traffic control.