- HomeX Magazine
- Paint Colors
- How to paint an accent wall with clean, crisp edges
How to paint an accent wall with clean, crisp edges
A smooth, sharp accent wall paint job adds instant character to any room. Learn how to choose the right wall, buy enough paint, and get crisp edges every time.
Words by Rosalind Tillery
- 7 minute read
A solid accent wall paint job anchors a space and gives a plain room immediate character. The trick to a professional finish is a smart color choice and strict taping technique for sharp edges.
Choose the right wall for an accent
Selecting the right wall is the first step. Look for natural focal points in the room. Fireplaces, large windows, and built-in shelves naturally draw the eye. An accent wall should highlight these existing features.
Solid, unbroken walls often make the best candidates because you want the eye to rest on the color. Too many doors or erratic window placements break up the visual weight and make the wall look busy.
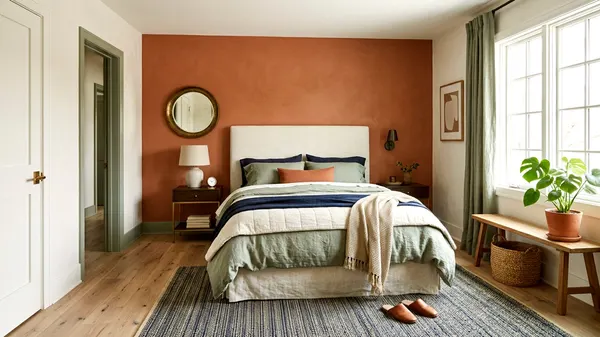
The wall behind the bed is the classic choice for an accent wall in bedroom spaces. It frames the headboard and grounds the furniture. When exploring accent walls living room layouts, the fireplace wall builds on the room's natural symmetry.
If your room lacks a clear architectural feature, pick the furthest short wall. A dark color creates an illusion of depth and makes a short room feel longer. Avoid walls sitting entirely in the shadows, as dark paint looks flat without light.
Pick a color that works with the other walls
Color creates the mood of the room. Deep blues, rich greens, and warm terracottas bring depth to a flat space. Study the undertones of your existing walls to match warm neutral walls with warm accent colors. Pair cool gray or crisp white walls with cool tones for a cohesive look.
Lighting changes how paint looks throughout the day. Buy small sample pots of your top three choices and paint large swatches directly on your chosen wall. Check them in the morning light, the afternoon sun, and again at night. The artificial light from your lamps will shift the hue considerably.
If you need some bedroom accent wall ideas, muted greens and soft charcoal grays create a restful environment. High traffic spaces like living rooms and dining rooms can handle bolder choices with high contrast. Dark colors absorb light and make the wall recede. Pairing a dark accent wall with light main walls provides a tailored look.
Buy the right amount of paint
Measuring the wall keeps you from running out of paint halfway through a coat. Grab a tape measure and find the width and height of the wall in feet. Multiply those two numbers to get the total square footage. Subtract the area of any doors or large windows to find your final number.
Sherwin-Williams says a quart of paint covers 100 square feet and a gallon typically covers about 350 to 400 square feet. Two coats are usually needed for a solid, even finish over an existing color. Compare your wall's area with those numbers, and a full gallon leaves plenty for two coats and future touch ups.
Pick a high quality latex paint. Flat, matte, and eggshell finishes hide minor wall bumps better than satin or semi-gloss paints. An accent wall draws attention, so any flaws in the drywall will stand out under a glossy finish. A flat finish absorbs light and makes deep colors look rich and velvety.
Prep the surface and tape the edges
Preparation determines how crisp your edges will look. Clear the furniture away from the wall. Put down heavy canvas drop cloths to protect your floors, since plastic sheets slide around and trap wet paint.

Wash the wall with a damp sponge and a mild cleaner to remove dust, cobwebs, and hand oils. Paint sticks best to a clean, dry surface.
Fill any nail holes or dents with spackle, then let it dry and sand it smooth. Older houses require extra care before sanding or scraping any peeling spots. The EPA says homes built before 1978 are more likely to have lead based paint, and renovation that disturbs painted surfaces can create a hazard. If your home is that old, hire a certified lead-based paint inspector or a lead-safe certified contractor before sanding or scraping.
Airflow is your next priority. The EPA advises increasing ventilation when using products that emit VOCs, such as paints. Open the windows in the room and follow the precautions on the paint label. Turn on a box fan to push the fumes outside and bring fresh air in.
Tape the adjoining walls, the ceiling line, and the baseboards using high quality painter's tape. Press the tape down firmly with a flexible putty knife. This creates a tight seal and stops the wet paint from bleeding under the edge.
Take your time in the corners. A straight tape line gives you a straight paint line.
Cut in the borders with a brush
Cutting in is the process of painting the edges where a roller cannot reach. Pour a small amount of paint into a handheld cup and dip an angled brush into it. Tap the brush against the side of the cup to remove the excess. Do not wipe the brush on the rim, as this removes too much paint.
Paint a narrow strip along the tape at the ceiling, the corners, and the baseboards. Work in small, manageable sections. Apply enough pressure to fan the bristles slightly. Keep the brush moving in long, smooth strokes to avoid heavy brush marks.
Feather the inside edge of your cut line by lightly brushing the wet paint out toward the center of the wall. A feathered edge blends much easier with the roller texture later. Do not cut in the entire room at once. You want the cut edge to remain wet when you start rolling.
Roll the wall for an even finish
Roll the main wall while the cut edges are still wet. This blends the brush strokes into the roller texture and prevents a visible border known as a picture frame effect. Pour your paint into a sturdy tray and load a roller with a nap suited to your wall texture. Roll it back and forth in the shallow end until the cover is saturated but not dripping.
Roll the paint onto the wall in a large W pattern, working from the top corner down to the bottom. Fill in the gaps of the W without lifting the roller from the wall. Maintain a wet edge to avoid visible lap marks.
Press lightly and let the roller cover do the work. Squeezing the roller against the drywall leaves thick ridges of paint.
Let the first coat dry completely. Check the paint can for the recommended drying time. Dark colors often look patchy and uneven on the first pass, which is normal.
Apply a second coat using the exact same method. Cut in the edges first, then roll the center. The second coat builds the true color and creates a durable, even finish.
Pull the tape at the right time
Removing the tape is a delicate step. Timing matters for a clean, sharp line, so follow the tape maker's directions and avoid waiting for the paint to dry completely. Dry paint forms a rubbery film that bridges the tape and the adjoining wall. Pulling dry tape can stretch this film and tear the new paint off the drywall.
Peel the tape away while the second coat is still slightly damp to the touch. Start at a bottom corner near the baseboard. Pull the tape back on itself at a low angle, moving slowly and steadily.
If the paint feels completely dry in certain spots, run a utility knife gently along the edge of the tape before you pull. This scores the paint, breaks the seal, and helps give a crisp corner.
Fold the tape in on itself as you pull it away. This traps the wet paint and stops it from brushing against the adjacent walls or ceiling. Throw the used tape into a garbage bag immediately.
Fix bleed and touch up the corners
Even the best tape jobs sometimes suffer from minor paint bleed. Paint can sneak into the tiny texture bumps on the adjoining walls or ceiling. A heavily textured wall is especially prone to bleeding. Keep a steady hand and a small artist brush ready for touch ups.
Pour a tiny amount of the original wall or ceiling paint into a small cup and dab the tip of the brush into it. Carefully paint over the stray accent color. Wipe away any fresh mistakes immediately with a damp rag. Let the touch ups dry and apply a second dab if the dark color still shows through.
Store the leftover accent paint in a cool, dry place. Tap the lid shut with a rubber mallet to keep the air out. Write the room name and the date on the lid with a permanent marker. You will need this paint for scuffs and scratches down the line.
Hang framed prints back on the wall once the paint has fully cured, as the can directs.